
Filed under:
Photo Create
|


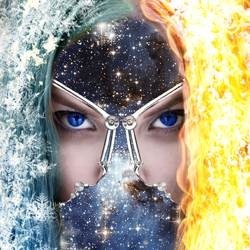
Create an abstract space fantasy photo manipulation inside Photoshop. This tutorial will show you how to combine several different images, blend them together using layer masks, and apply color adjustments.
Step 1
Open file " Portrait of a beautiful girl with snow in hair ". Open file " Stars Background ", Ctrl+A to select all, copy than paste it in our document. Resize it so it fits our girl layer.
![image003[4]](https://lh3.googleusercontent.com/blogger_img_proxy/AEn0k_t0ZKYIa7ybfMCITLhMIZfSL2fVR4lB39BB2QbOhvELro4r9d1IjAdl78rLyQkCP_KM6VVpdYVhk55J-L1kTsPaO-uiKeAcSKZJVpNHzCSQMyn3nxZC_14MShZKzk4dxnhYEwotjk-g3vBNG00B=s0-d "image003[4]")
Step 2
Add a layer mask to the stars layer and fill it with black. Using a soft white brush paint with white in the layer mask until the image looks like shown below. Be careful around the hair.
![image004[4]](https://lh3.googleusercontent.com/blogger_img_proxy/AEn0k_u4QMVJdlVQveF5UegxkcTILxeZaO6PCtyLTke11rsBDgmRqh4p-cAcAKbNT01TmDHolkHGaORm9_PkSVGM-uq3PQHSNasWpmQLX0SlvCcLGrLCSKeO4oIdIEkXYNAQYMZ3X7acTx_P90L4wXz22Q=s0-d "image004[4]")
Step 3
Add a Hue/Saturation and use the settings shown below. Fill the layer mask with black than using a soft white brush paint with white the hair on the left side. This will be the icy hair.
![image005[4]](https://lh3.googleusercontent.com/blogger_img_proxy/AEn0k_s5bDlohFCx1Bo3I3Kw01kbXaQ6vGBhoZc4Dg70N_x6SNEfKVw4CN9U9-Y_d1esGF_QXtfaRkkIAslhUTBqDwQdbsy70ZMYBni-Mw0987a2y0SDb3Ynqrd_GMuxYcwMe1qLDhschFICxjkokZKsYw=s0-d "image005[4]")
Step 4
Add another Hue/Saturation layer and use the settings shown below. Change the layer's blend mode to Linear Light. Fill the layer mask with black and using a soft grey brush paint the hair on the left side. This will be the fire hair.
![image006[4]](https://lh3.googleusercontent.com/blogger_img_proxy/AEn0k_vivtc4OQvn1zGvx6QorxsDFlMuqTCY0BcJykwDyOOkNtWWsioB6kgS9rmDjH0TsjERjLCUY1CbzDCiLQkgPA6_Cuszeboai2peiJHUBRv7FYa5IHE-oYePIK1Fvyiu_DzXYM1qqRHF12ilOIKJTg=s0-d "image006[4]")
Step 5
Open file " Fire Flames ". Press Ctrl+A to select all, Ctrl+C to copy than use Ctrl+V to paste it in our document. Duplicate a few times this layer than resize each duplicate until it looks like shown below. We want the fire to cover the right side of the girl's hair. Select all fire layers and pres Ctrl+E to merge them than change this new layer blend mode to Screen. The black color will disappear, leaving us only with the fire flames.
![image007[4]](https://lh3.googleusercontent.com/blogger_img_proxy/AEn0k_veuSUmrufeiHQEk07v0NlKv4FUXB4oLiEeXFuHyon_3E0TX_V1_lNjP7faWxAebEIr4_8DyghnJEhqkF4nmxE4LT6ggul3TNer5Kx-2feJtPnXEqYkdW0w3iT7hS1sAW-f-pqaMgKGAw9OJnoA1g=s0-d "image007[4]")
Step 6
Add a layer mask to the fire layer and paint with black to mask the straight lines and limit the flames only to the hair.
![image008[4]](https://lh3.googleusercontent.com/blogger_img_proxy/AEn0k_uOjTs6OSWhBGhl43Crpj3YB8PG1A5rtO3pj2-hlc04ko2XZEFD6BKGRkMxlhN82gLD8EdXT9gwhBDP3cAnDPbdLXq9ou6sEs0JlpHKtMDIalpKtA0O7Ca4jQG_beckRoeBwec4sN8N1ZrOZ3is=s0-d "image008[4]")
Step 7
Paste the " Fire Flames " again into our document, resize it to make it biger, duplicate it once, merge the duplicates , change the layer blend mode to screen and paint with black in the layer mask to hide the flames outside the hair. This step will make the fire more intense and will add to the flames variety.
![image009[4]](https://lh3.googleusercontent.com/blogger_img_proxy/AEn0k_sVyc58jWIE0Q4mgzEPMJOT4WavPGe-z95SSXZI7d_tbdg5Sh4ejqZfOyjpQH64ak-BXe487p0Xc_Hd0ECBz9CvCIldw3mKWXa7WpSXXXxTHZLV-gHoPROEoIPQMyNmh6s9YvAJ9QPyOIELn-g9=s0-d "image009[4]")
Step 8
Make a new layer and choose white as foreground color. Than select some ice brushes and paint snowflakes in the left side of the girl's hair. Double click the background layer than press ok to make it a regular layer than select all the layers and group them using Ctrl+G. Name this group "Base".
![image010[4]](https://lh3.googleusercontent.com/blogger_img_proxy/AEn0k_tvMcL2GJ-PIVHMw5xDU_b3QEdChnaB4Da35hpRpb06glO8W_-xb9Dh-Wbo-UWhOz0aK5NUcEONnIWxF-yjlphW71ulkyrcEHzBiofSffL0PVSB4PBBt3l3UYJ5qN8_CWeiBsI-CbvQT6FDotYr5Q=s0-d "image010[4]")
Page 2 of 3
Step 9
Open file "Fat Boy 2". Make a selection of the part shown below than copy and paste it into our document. Use Free transform to position and distort it until it looks like shown below.
![image011[4]](https://lh3.googleusercontent.com/blogger_img_proxy/AEn0k_uOBNArUQPYdQtk8BWtuHrdOt6I9d8eQ3tp0XEXtTpWECd1ZB9LdzHRIeaidlP821iJ2ULxpq5DKDW-PzEy0GfLQ5ug5bIw18dPcoPXKbs9MxRMEaUpebEdaMk6GVO-fSvW3tUTwpedNdr8RHKbvA=s0-d "image011[4]")
Step 10
Go to file "Fat Boy 2". Make a selection of the part shown below than copy and paste it into our document. Use Free transform to position and distort it until it looks like shown below.
![image012[4]](https://lh3.googleusercontent.com/blogger_img_proxy/AEn0k_v6H8wleMAzRcql4m4GHU1RFz6j3rQgBkI9M3Ac-t5LC5GqewjrjfWLeA_CDW5kH9LJ-B3UJ3dwPqCqy3rHde9y25WoRAN5ELjYCC6FTyJKpOQ_VfFVrKyrjnRAbUGRHV9fJ9C3-j8g5e9M1UdV=s0-d "image012[4]")
Step 11
Go to file "Fat Boy 2". Make a selection of the part shown below than copy and paste it into our document. Use Free transform to position and distort it until it looks like shown below.
![image013[4]](https://lh3.googleusercontent.com/blogger_img_proxy/AEn0k_vsOS9WwVdpaJ9Lhicvcz2r3Bdv0OrgOkxTQzz-ruY-93UHbKnMWilENOzMq9foxGm0gMbzFEHusc4TAHt6GI4-nqXDs-Qn2mgxARx-_ZvmdDadUFcH9YYuRhn5heCQUb8a_Il3rVdSb7zEHbJA1A=s0-d "image013[4]")
Step 12
Go to file "Fat Boy 2". Make a selection of the part shown below than copy and paste it into our document. Use Free transform to position and distort it until it looks like shown below.
![image014[4]](https://lh3.googleusercontent.com/blogger_img_proxy/AEn0k_tc2MKb_35jTM6MeAFkUIOZtMbtIcwWE4QPu73yGYNVzin5ewAIDTev3y_g6MipRCA57HYz3oBkQKgYMSA_0b4JqDZ7we9AWUt7hsHwhrApel34AlX4Xc99Un1ty2FmhnqnZjev9IQoq9xESPkE-g=s0-d "image014[4]") Step 13.
Step 13.Go to file "Fat Boy 2". Make a selection of the part shown below than copy and paste it into our document. Use Free transform to position and distort it until it looks like shown below.
![image015[4]](https://lh3.googleusercontent.com/blogger_img_proxy/AEn0k_slydvyK-VEqS5bJIdnPnWKlM0BRm3qsUMD5UOBMw5KW_jB_wjXJH-WtcDWFKQZMVMF9c7AEolqZX7v3oI5z_Tw-l0CdWZMjCv3GdDZfM8ppnNdDn54gZun3EQfgBej9JyJrOuseLaUgeDTU7ytkQ=s0-d "image015[4]")
Step 14
Go to file "Fat Boy 2". Make a selection of the part shown below than copy and paste it into our document. Use Free transform to position and distort it until it looks like shown below.
![image016[4]](https://lh3.googleusercontent.com/blogger_img_proxy/AEn0k_skfy_zsrxkVF8CzcJnkTUUBXxEGsmbN34zqiyRKN-Rs0CDIlP2h_3M8xL2Z6ga7KZIpDqBxpktT4WtPXGyMBiDwJr_EZo3df-0blnyRoeqVoysVF2W_KN6lUyxn_gR8e8MpBDJrWOb5sCvEsaVsA=s0-d "image016[4]")
Step 15
Select all metal layers and merge them using Ctrl+E. Add a layer mask and mask away until it looks like in the image shown below. Name this layer "Right Metal".
![image017[4]](https://lh3.googleusercontent.com/blogger_img_proxy/AEn0k_uavv1W4n8_3q_fctEegJ06JZNnTBToyKBpUbB_H3pcyNqXDGxbzEMp_aENsLx6fen3Snzi4Tox2IegTqSSvCkNy-mxkNYKPjsmC3QoVHQK_2dR4dHfZY7xZ42mstVR7bF2uoiR5ZiJePAcJpHBlQ=s0-d "image017[4]")
Step 16
Double click the layer to enter advanced blending mode and use the settings shown below. Make a new layer and select a soft brush at 10% opacity. Sample some orange color from the fire and paint over the metallic parts. Alt+Click in between these 2 layers ( the painted layer and the right metal layer ) to clip the paint layer to the metal layer. This way we make sure that all the painting is applied only to the metallic parts.
![image018[4]](https://lh3.googleusercontent.com/blogger_img_proxy/AEn0k_vRB-P38Jk_i4OuNuAafiAn-5HPSuDiog6HC_i5M2Qdx0KWG-ZWEElXYhdilTPM9Ct90p26ompsD5DN_acIkncTCGj2-i6hoX2GzVUAO5jY2vFTOdnMBEf5T1G8IXVzJJUY9hfuXMkDPqZGORi9pw=s0-d "image018[4]")
Step 17
Make a duplicate of the "Right Metal " , press Ctrl+T to enter Free Transform, right click and choose Flip Horizontally than position this on the other side of the face. Make a new layer and select a soft brush at 10% opacity. Sample some blue color from the icy hair and paint over the metallic parts. Alt+Click in between these 2 layers ( the painted layer and the right metal layer ) to clip the paint layer to the metal layer. This way we make sure that all the painting is applied only to the metallic parts.
![image019[4]](https://lh3.googleusercontent.com/blogger_img_proxy/AEn0k_vIvjKwSaXmF3MjKbb6phcc0SS38ijU0t6GdrbVdLswDyH2Zu3nSMYAzDb3_uYKF1bX_4pyjPuqhYOdymp2OvkA5HwcK8sUB0pQdvlXGZEq61DlSjQshJn2plctvVM3zoZ0Em2J1kl3to5ajSLUSw=s0-d "image019[4]")
Step 18
Let's improve the fire reflectio in the right metal layer. To do this add a curves adjustment layer and use the settings shown below. Group the layers shown below than change this group blend mode to normal. This way the curves adjustment layer will only apply to the visible layers inside the group only. Select the layer mask of the curves adjustment layer and paint with black the icy metal parts.
![image020[4]](https://lh3.googleusercontent.com/blogger_img_proxy/AEn0k_suMPlEAoGERyCM0JWFXmsqru5Xe1U62atplLzV8IShk8TUHnk5kk9H3A-b0Qhw4JW9UckYZm-piFRJvZ4t_PN-51gD9E1QtE-LAfIvsTvSQzv1sDfA_Ss3bssQQfAh-qrAxu_-AI8CSbIqL6iM=s0-d "image020[4]")
Page 3 of 3
Step 19
Open file "Earth Seen From Apollo 17" and make a selection of the Earth. Copy it than paste it into our document. Use Free Transform to position the Earth like shown below.
![image021[4]](https://lh3.googleusercontent.com/blogger_img_proxy/AEn0k_sB5-Hr8dZ_CULM7KJpT_14sBuJ6s5fNtYPEUmNIR4ffo-VX9llICFh8gUXslhjHlmaT6ZGqpvaDMyoKfOQbYP4B4vzlVUOLb0DYlBZg9QTvvLXM8RrOwD8EBBBxCHFO6Z3s2W2NEcYse6Iy8OT7w=s0-d "image021[4]")
Step 20
Double click the Earth layer to enter advanced blending mode and apply the setting shown below. With these settings we will make the Earth look more 3D.

Step 21
Add a new clipped layer above the Earth layer and select a round soft brush at 10 opacity. Sample a color from the fire and paint the left side of the earth. Change the layer blend mode to Overlay.
![image023[4]](https://lh3.googleusercontent.com/blogger_img_proxy/AEn0k_viwRVKLXv1kFIO0jXMG0nRGnMD_rGxhbn0MiMeZMy9rqS5tJpCg7j-9I9WE-WAkPbfuyoFiuJEdnV-k3EfueZr1_zkFceZpggAGh4ebs5nHMbwEPIDtLT2ioRqMgeA4mA9wsUUiALdZ9HPsWlzJg=s0-d "image023[4]")
Step 22
Make a new layer and set black as Foreground color. Select a tree brush and paint a tree on the Earth.
![image024[4]](https://lh3.googleusercontent.com/blogger_img_proxy/AEn0k_tnEuHuFjMQIaTTIExoG_ezHHR-yDZbYNoH6wGZzm2dDGs5VFhvB8dIvQUR74EbWTUfpG_U5CVv7Nq85os9cdQOcwWct3BRXS6y8LxuAUJqd2XFrGoppeCwVmKRi9MxzDYY2qHsERYf7NP_hTsH=s0-d "image024[4]")
Step 23
Duplicate the earth layer and free transform like shown below. Choose a 50% gray as foreground color and using the gradient tool mask the outer part of the shadow tree. Change the layer blend mode to Multiply.
![image025[4]](https://lh3.googleusercontent.com/blogger_img_proxy/AEn0k_vUFwjW8ugyVKsRKhP6F-nLB-9-stJY8VMfZTfJbCGaokz9v_HwLTiHmwL5cIJSxlwt_YGPXMsy-bKiqH2RPPmxDe-Dv9T4M65FTXuzCs5xyh2qXG4MJC0OFezfvN--ziUAi0ZAoIdwXy5E68gK=s0-d "image025[4]")
Step 24
Make a new layer and using a light beam brush paint like shown below.
![image026[4]](https://lh3.googleusercontent.com/blogger_img_proxy/AEn0k_vU_QRCnV91YBln1iWfd5UdkpZi245196WBjgGMngELlCO7yDiTCYSqiCm3-QDcx8Z_xmIS92xN3r2T6CfyKmTDSf260yxGQYyVVz3LmbelG0wh6MwtgURs4UyDxAr_PKe-Il8V4VZ8OM86vN9eUQ=s0-d "image026[4]")
Step 25
Is time for the overall tweaks. Add a Vibrance adjustment layer and use the settingsh shown below. Fil the layer mask with black than using a round soft white brush at 50% opacity paint over the hair, the eyes and the Earth. This step will give us some vivid colors.
![image027[4]](https://lh3.googleusercontent.com/blogger_img_proxy/AEn0k_u0Evss_-tY3pBFCbdBlzXgFo0GoWQA_WNNiNGsV5f8MBpCYSGAi-gojWKEirh9cuIdy66hWV5LppXq_gwSYf4xXLuyg42BuHUYDx88xIKEIgr5x7h4QpGFHosbfs0quSB9Nv5xusokiKJX5MQkLA=s0-d "image027[4]")
Step 26
Let's improve the blue colors in the eyes and left side of the earth by adding a curves adjustment layer, fill it with black and paint with a soft white brush at 50% opacity over the eyes and the earth.
![image028[4]](https://lh3.googleusercontent.com/blogger_img_proxy/AEn0k_tzEzEVGIEUfmrow5C0Xamiqp2jiH3-LyGTIj0U7WRqpCYRrB5YmSRjvRQWP0HDgXNK35vQ_dm2CkdP4KuRJG-WWKNjChDZNNkaApCdDPt3HQrlpTvXzeVsb057E6_bw0AUBiJAZJmFGMULasue2A=s0-d "image028[4]")
Step 27
The right side of the Earth should be more orange because the fire is burning close so let's correct this by adding a curves adjustment layer, fill the layer mask with black and using a round white soft brush paint over the right side of the earth. Lower the layer opacity to 65%.
![image029[4]](https://lh3.googleusercontent.com/blogger_img_proxy/AEn0k_uYKDHWgxuOAF6yjBqfVnPQRZBaqIjGDZWqCvojBQu_PbuSrfsBa1eEXYcX4lTEBgShPMv9_sQGA8tuSOSBkSSl1rmMQ6xVpC-8xSfiXgZuIyuYtbLbA91j_BsOvX07PgNFweFkLmR9ewyFkksi=s0-d "image029[4]")
Step 28
Let's improve the contrast. Add a Black/White adjustment layer and change the blending mode to Soft Light. Lower the opacity to 90%. Paint with black in the layer mask the corners of the eyes and the earth because not doing so will clip the black colors completely.
![image030[4]](https://lh3.googleusercontent.com/blogger_img_proxy/AEn0k_vYGXCwtlllg7DYfYZKtFc4PFpogoGymLNoO9HqQzneW3Z59ecCJGTgLiSav5uL_D_L70nSJj9KMVr4GGIaSZJ8r5g-oq8S_PU0_3z8jTQqVmrswK8svtjRRF_PK8zp3f9f5bKOCPyBEUdfNEc-=s0-d "image030[4]")
Step 29
I am stil not satisfied by the contrast so let's increase it even more. Add a gradient map adjustment layer and choose Black, White from the gradients presets. Change the layer blend mode to Luminosity. Fill the layer mask with black and using a white soft brush at 50% opacity paint over the eyes and the icy hair.
![image031[4]](https://lh3.googleusercontent.com/blogger_img_proxy/AEn0k_uBQrWVO60y4kJk-5mMY1MyisFxE8OFNM_PdIhgFUwiNG09bD6rfaPRrzqRQl2Ux8ZFkPIKnfOkq5T-DJAg4wzJZ0_ljATd1p-7lsc1_BWaDOWPXRdydmsYaL4j2M5MhtkW9KrRHgSpc8j4eOpN5w=s0-d "image031[4]")
Step 30
Add a curves adjustment layer and drag the curve downwards to decrease luminosity. Fill the layer mask with black and using a white soft brush at 80% opacity paint over the stars background.
![image032[4]](https://lh3.googleusercontent.com/blogger_img_proxy/AEn0k_v22pzbmFNlJgPluCk-u2An_1WoEUD_2Gu5moA_OlJi4HdRHKlbKQ83Cuj9BwiwdcyqrEYlEyyQjY--o5aLTRkD2nwmaC1dj5_0qhvpMgNqeDB29RK-5v_4ivYx9uUmfD25-PqPb96SDwXHO9j8Tg=s0-d "image032[4]")
Final Result
![image002[5]](https://lh3.googleusercontent.com/blogger_img_proxy/AEn0k_vkaNC_tRRWl39zV3GxbkHHJBR8cmZ15YaKfDy-Y22406eNbkle6pxvHR1MkkHDbTpP8TACfiKGq0QmoT6v6VQ6ZNyq5Spe1Wnb18YLyaBosCVEznlB07g9EQsuIWvNUTDOyGOcIBDA6-MDPurX8A=s0-d "image002[5]")
About this blogger theme
Save the Queen blogspot template is the first template I have created. This is free, supported and ready for download. If you have any questions feel free to leave your comment on my weblog. Hope you like it. Enjoy!
Save the Queen blogspot template is the first template I have created. This is free, supported and ready for download. If you have any questions feel free to leave your comment on my weblog. Hope you like it. Enjoy!

Related Posts
No comment yet
Create a Fantasy Space Photo Manipulation Using Photoshop
Create a Fantasy Space Photo Manipulation Using Photoshop
Categories
- Create Icon (2)
- Photo Create (27)
- Text Create (3)
- Wallpaper Create (8)
- Website Project (2)
Popular Posts
-
Learn how to create this leatherback book design in Photoshop. This tutorial will show you how to draw a book and apply textures and layer s...
-
Create a great website design in Photoshop! This tutorial will show you tips and tricks for creating your own blog layout. In addition to ba...
-
In this tutorial, we are going to learn how to create a realistic Silent Hill inspired artwork. This tutorial covers techniques such as crea...
-
Learn how to create a detailed Apple Safari icon in Photoshop. This tutorial will show you how to create shapes and use different layer styl...
-
In this tutorial you will see how to create a minimal and clean blog layout using Photoshop. You will also learn some useful methods and pra...
-
As we know, the parrot lives in the forest, and he loves nature - trees, flowers, etc. What the parrot is trying to tell us is that his life...
-
Create an eerie see-through ghost photo using just a single image. This Photoshop tutorial is great for beginners and will show you how to q...
-
Alice in Wonderland is one of the most popular fantasy stories told all over the world! In this tutorial you will learn how to create a Wond...
-
In this tutorial we are going to learn how to make a poster inspired by WWF creative posters. With a couple of images, we will create a beau...
-
This tutorial shows creating a beautiful and vivid, typography based artwork. You will learn to combine different elements and applications ...


Add your comment below